How to write JavaScript in Eclipse IDE
Eclipse is another popular free, open-source IDE among web developers and developers who use other programming languages. It was built for Java development but now included many tools for working with other programming languages: HTML, CSS, JavaScript, Ruby, Python, PHP, etc.
Eclipse can handle entire web projects and even can be integrated with any other popular development tools required to create web applications into a single interface.
In addition, it also supports various plugins and anyone can create plugins to extend Eclipse’s functionality. Due to so many features included in Eclipse, we can also use this IDE for web development.
To use Eclipse IDE for the web development project, you will need to download eclipse and install it. So, let’s understand step by step download and installation process.
How to Download and Install Eclipse IDE?
There are the following steps to download, install Eclipse, and set up the development environment for JavaScript. They are as follows:
Step 1: Download the eclipse from the given link: https://eclipse.org/downloads
Choose the latest stable version of the eclipse IDE and make sure that if your computer system is 64-bit, choose 64-bit eclipse.
Step 2: Once the download is completed, click on elipse.exe to open the eclipse that will ask to select a local directory as its workspace. Workspace is the folder or place where eclipse will store your projects.
Step 3: Create or select a local directory on C drive where you want to store your JavaScript project, and click on the OK button to start eclipse.
You can also create a folder with a suitable name for your JavaScript project on C drive and browse that folder from the workspace launcher.
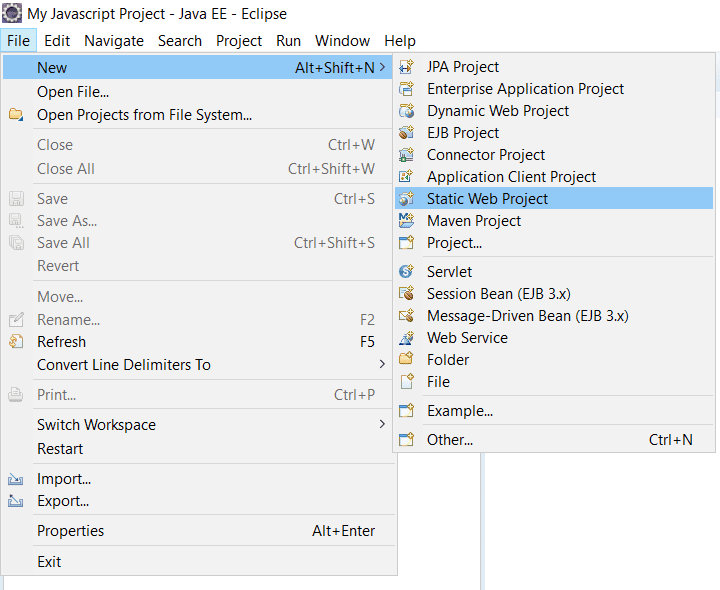
Step 4: Once the eclipse opens, navigate as File -> New -> Static Web Project. Click on the link as shown below in the screenshot.
Step 5: It will open up a window dialogue box that will ask you to enter the name of the project. Enter the project name “JavaScript Project” and click on the ‘Finish’ button as shown in the below screenshot.
[adinserter block=”5″]

Step 6: Expand the JavaScript project directory on the left-hand side of Eclipse (project explorer) and right-click on the ‘WebContent’ folder.
To create an HTML file in the current JavaScript project, navigate to New -> HTML File as shown below in the screenshot.

Step 7: It will open up a window dialogue box that will ask you to write the file name. Please type the file name “myJavascriptProgram” and click on the ‘Finish’ button as shown below. It will create an HTML file for the current static web project.
[adinserter block=”2″]

At this point, we have successfully completed the development setup for JavaScript programming with project structure as shown in the below screenshot.

In the next section, we are going to write our first JavaScript program using this setup.
Writing My First JavaScript Program in Eclipse IDE
In the last section, we created an HTML file named myJavascriptProgram.html. Now it’s time to write the first JavaScript program.
Let’s write the following JavaScript code snippet in the editor as shown below and then save it.
<!DOCTYPE html>
<html>
<head>
      <meta charset="ISO-8859-1">
      <title>My First JavaScript Program!</title>
</head>
<body>
<script>
        document.write("Welcome to my first JavaScript program");
</script>
</body>
</html>
In the above JavaScript program, we have placed some JavaScript code between the opening body <body> tag and closing body </body> tag of the HTML file.
In the next section, we will learn how to run a Javascript program in Eclipse IDE.
How to Run JavaScript Code in Eclipse IDE?
To run JavaScript program code in Eclipse, right-click on myJavascriptProgram and navigate to New -> Open with -> web browser and click on it as shown below.

Eclipse will open the web browser in the editor and display the following output.
Output of code:
           Welcome to my first JavaScript program
Creating JavaScript External File using Eclipse IDE
There are the following steps to create JavaScript external file in Eclipse that is as follows:
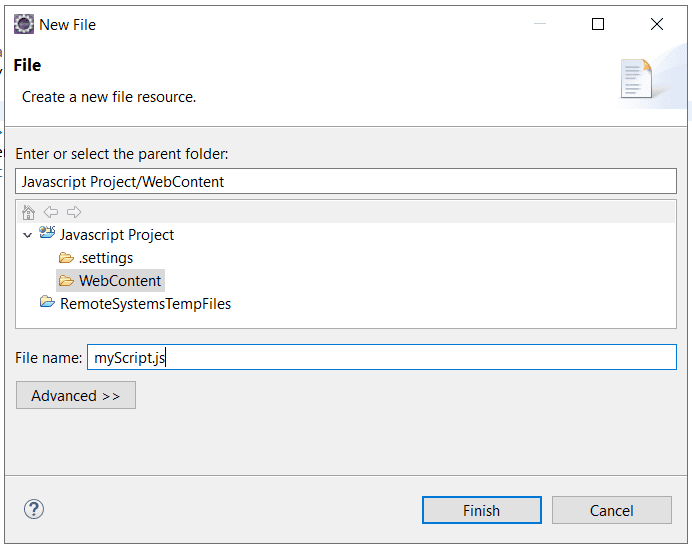
Step 1: Create a new file to write JavaScript code by choosing New and then File from the File menu.
The New File dialog box will open where we will write myscript.js in the File name text box, as shown below, and click on the Finish button.
Step 2: Eclipse will add a new empty JavaScript file named “myScript.js” to your project. If this file doesn’t open automatically in the editor, right-click on the myScript.js file in Project Explorer, choose Open With, and then click Text Editor.
Now you will see two files named “myJavascriptProgram” and “myScript.js” on the screen.
Step 3: Write the following code snippet in the JavaScript file named “myScript.js” and save it using Ctrl+S. You can also save it by selecting Save from the File menu.
document.write("Creating an external JavaScript file in Eclipse");
Step 4: Now add the following code in the script “myJavascriptProgram.html” and save it. In the code snippet, src is an attribute and “myScript.js” is the value of attribute src. We have added src attribute to the opening <script> tag.
<script src = "myScript.js"></script>
The complete code structure is given below:
<html>
<head>
<meta charset="ISO-8859-1">
         <title>Creating an External JavaScript File using Eclipse</title>
</head>
<body>
        <script src = "myScript.js"></script>
</body>
</html>
Step 5: Right-click on myJavascriptProgram.html in the Project Explorer and navigate to Open with, and then click on Web Browser.
Eclipse will open a browser window in the editor, where you will see output of code snippet on the web page.
Output of code:
             Creating an external JavaScript file in Eclipse
This is a basic primer about JavaScript development with Eclipse that is completed. If you want to get more information besides, I will recommend visiting the Eclipse website.
In this tutorial, we have covered almost all the important steps related to how to write JavaScript program in Eclipse IDE. We hope that you will have understood how to run JavaScript in eclipse. In the next, we will learn how to add JavaScript in HTML document.
Thanks for reading!!!
